The 12 is a ceiling mount for a projector that is said to not fit the Epson Universal Projector. It is given one star because it did not fit the Strong Projector Mount. It is possible that you could get the correct version and it would extend.
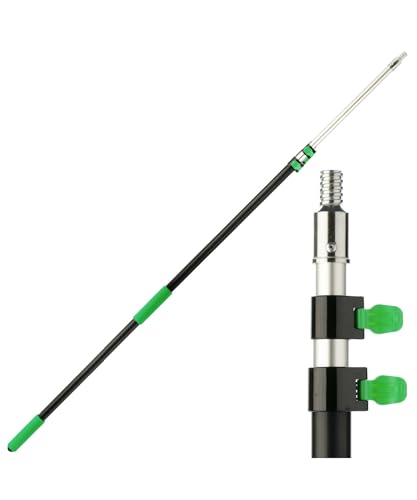
The 12″ Extension Pole Tube with internal cable management is a great way to keep your cords organized and tidy. This tube is compatible with the Universal Projector Ceiling Mount AMRP100 or AMRDCP100KIT.

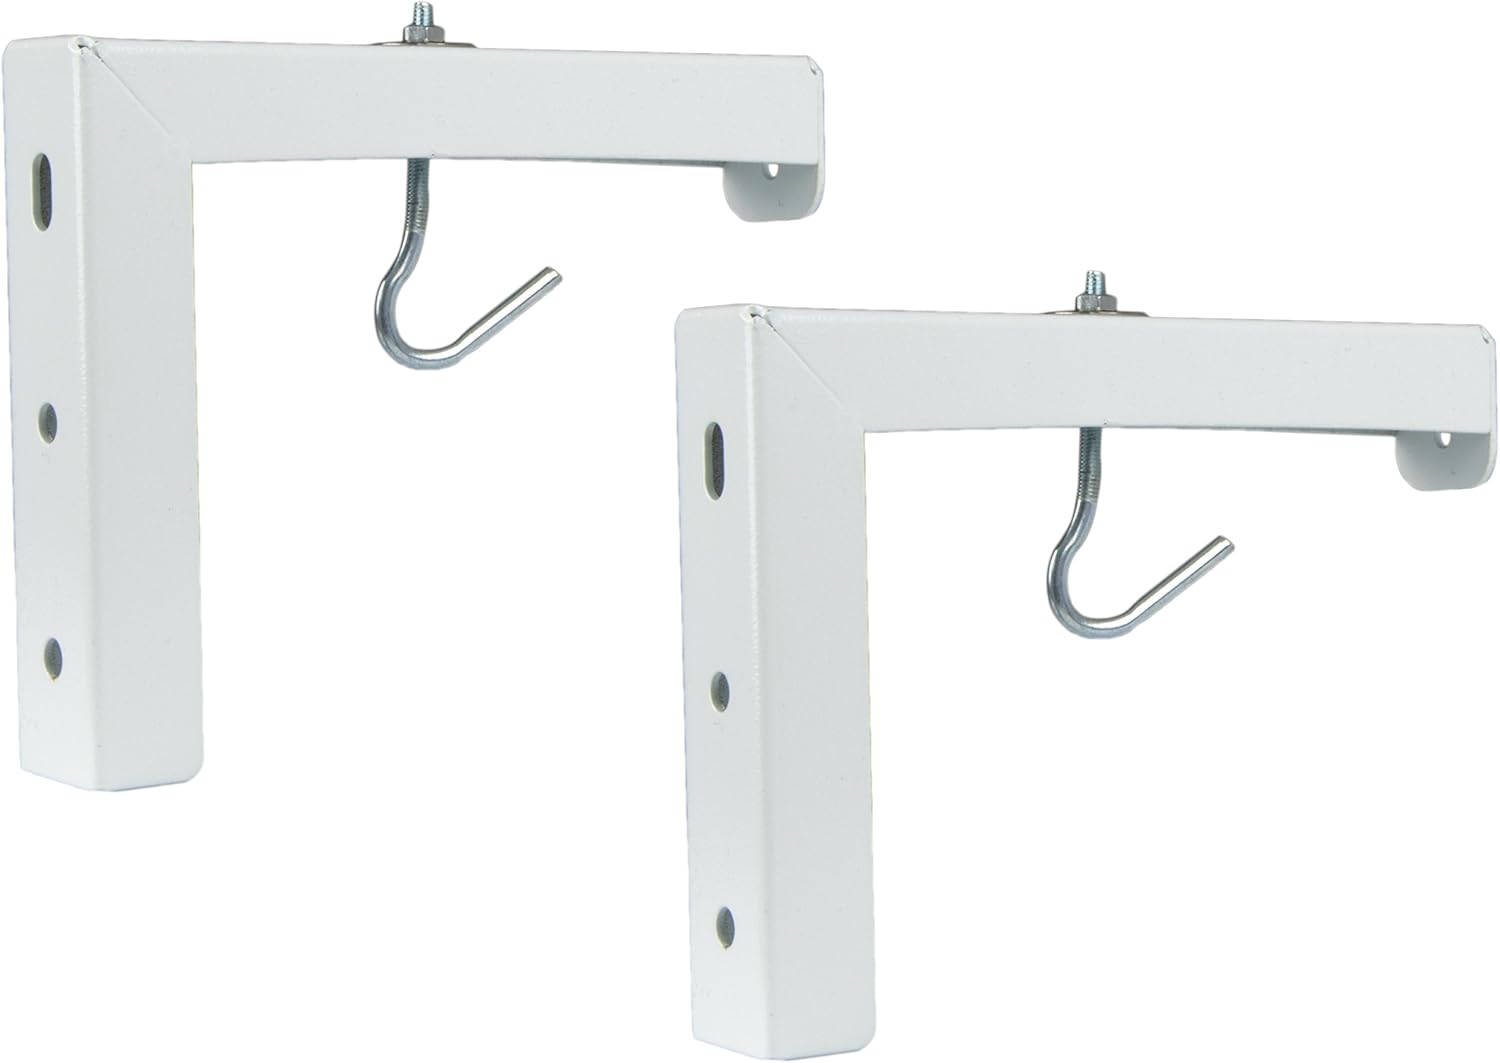
12, Extension Pole Tube with internal cable management for use with Universal Projector Ceiling Mount AMRP100 or AMRDCP100KIT
View on Amazon
Features – 12
- Extension pole tube
- Internal cable management
- For use with Universal Projector Ceiling Mount AMRP100 or AMRDCP100KIT
The 12-inch extension pole tube is designed to be used with universal projector ceiling mounts. It has internal cable management to help keep cords and cables organized and out of the way. This product is easy to install and is a great way to keep your projection equipment safe and secure.
Pros
In the book of 12, the author, Dr. Phil McGraw, dives into the minds of twelve different people to better understand why they do the things they do. He looks at the different motivations, emotions, and thought processes that spur people to act in certain ways and provides helpful advice on how to change these unhealthy patterns. The book is full of interesting case studies and real-life examples that make it easy to understand and follow along.
Cons
None found!
The book is set in the year 12, when a group of friends decide to spend their summer break in a remote cabin in the woods. While there, they discover a secret room that leads them on a journey through time. As they travel back in time, they learn more about the history of their town and the people who live there. Along the way, they make new friends and find themselves in the middle of a mystery. >>> Check Price <<<
Conclusion – 12
The 12, Extension Pole Tube with internal cable management for use with Universal Projector Ceiling Mount AMRP100 or AMRDCP100KIT is a great product for those who need a little extra help when it comes to mounting a projector. The internal cable management system is a great feature that will help to keep cords and cables organized and out of the way, while the universal projector ceiling mount is a great option for those who need a little extra adjustability.
Related Images
12 is a number, an integer, and one of the fundamental aspects of mathematics. It is the basis for our number system and is used in counting and measuring. It represents a whole number and has many applications in the real world.

It is a natural number that comes after 11 and before 13.

There are twelve months in a year. Each month has either 28, 30, or 31 days.

It is 12 o’clock.
12 represents the completion of a cycle, it is a number that symbolizes harmony and balance. It is often seen as a lucky number and is used in a number of auspicious circumstances.
Assuming you are talking about the number twelve, it is a number that comes after eleven and before thirteen. It is the last number of the teens and is a composite number. Twelve is a abundant number and a happy number.
It is a two-digit number.There are six numbers between 1 and 12. The smallest two-digit number is 10 and the largest two-digit number is 99.
Related Videos
TOP 5 Best Projector Ceiling Mount of 2022 [Buyer’s Guide]
We made this list based on our own opinion, research, and customer reviews. We’ve considered their quality, features, and values when narrowing down the best choices possible.
The fifth product on our list is the VIVO Universal Ceiling Mount. The VIVO mount has a beautiful design and fits the majority of the projectors in the market. It has been designed and made from high-grade steel and comes in either white or black. It must have a hole in the back that is of 12.5 or fewer inches to mount. The high-grade steel material used for the mounts makes it long-lasting and can support the projector’s weight up to 30 pounds. The mount can hit all the right angles of the projector viewing in this way. With the Vivo adjustable mounts, you can hang just 6 inches from the ceiling. You can enjoy the best display you want and the size without changing the projector’s position every time you want. You will find a mounting plate that is designed with four holes for installing on the ceiling. They have attached an arm that is adjustable and allows you to tilt, rotate, and swivel. The bottom bracket has four holes that help in the fastening of your projector. The whole installation process is straightforward. Just follow the instruction provided step by step.
Its pros are:
* It is adjustable.
* It can hold a projector of up to 30 pounds; and
* It can be tilted and rotated for excellent image positioning.
However, its mode of fastening to projectors could be limiting. The Vivo Mount is convenient due to its easy installation. It also feels the most secure, while requiring the least modification to ceilings or walls.
Up next in fourth place is the WALI Universal Projector Low Profile Mount. WALI universal projector is a massive projector supporting a loading weight of up to 30 pounds or 13.5 kg. It also works with regular concrete, brick ceiling, and wooden stud. It is compatible with distance mounting holes between 2 inches to 12.5 inches, and it is fully adjustable. You can tilt or swivel it at greater than or less than 15 degrees. The presence of an angle adjustment bracket allows 360 degrees of rotation. Its low profile design ensures quick and precise projector positioning and is capable of holding your projector just 6 inches from the ceiling surface. It can mount to wood studs, concrete and wall surfaces, flat ceiling, drop ceiling, and suspended ceiling. Another essential feature is its quick and easy installation. You can quickly release and fasten the mount to the ceiling.
Its pros are:
* It can be tilted and rotated up to 360 degrees.
* It works with concrete and studs; and
* It is affordable.
However, the cons are:
* It isn’t easy to install it on drywall; and
* Mounting is not very stable.
WALI Universal Projector Low Profile Mount is a high-quality product that is affordable and provides excellent value.
Still haven’t found the Projector Mount that meets your needs? Well, keep watching because we have more lined up for you. Meanwhile, if this is your first time visiting our channel, be sure to subscribe and hit the bell icon to receive notifications of our next videos.
The third product on our list is the Mount-It! Ceiling Projector Mount. The Mount-It! is versatile and suitable for any installation. It is made from solid steel to ensure durability with minimal vibration compared to aluminum models. It is easy to set up. What you have to do is install it flush to a ceiling, lower it down from a high top, or to a wall. You can then find the best projection angle with pitch, roll, height adjustment, and extension from the wall. The quick-release connector allows the projector to be installed quickly and released for maintenance without re-alignment. The mount supports both the vertical and horizontal extension. The vertical extension adjusts the bracket’s length from 5 inches up to 25.6 inches from the ceiling while the horizontal extension adjusts the length of the bracket from 13.5 inches up to 22.5 inches from the wall. It also has adjustable arms extending to fit mounting hole patterns between 8.85 inches and 12.4 inches. This mount has an excellent cable management system. It conceals HDMI, audio, and video cables attached to your projector for a more organized appearance.
Its pros are:
* It supports full-motion design that lets you pitch your projector up.
* It has three mounting options; and
* It supports a vertical extension of up to 25.6 inches from the ceiling.
However, putting the mount together is tedious. The Mount-It! ceiling mount is a good buy because of its lightweight,
DIY Projector Ceiling Mount | It’s ugly, but it worked.
In this video, a YouTuber demonstrates how to make a projector ceiling mount for a home media room. The manufacturer of the new projector did not put the mounting holes in a convenient location, so the YouTuber has to move them. They do this by taking a piece of red oak and cutting it to size, drilling two holes, and then screwing the red oak into where the old holes were. The YouTuber then has to adjust the keystone and other settings to get the projector to project onto the screen correctly.
How To Make A Wall Mounted Entertainment Center
In today’s video we’re going to be back in a bedroom and I think I have just that thing to solve not only my problem, no, but possibly yours. So if you have a TV thing, you might have things that need to be plugged into it and you might need somewhere to put those things. Hmm, the big question is, would this work for you? If you’re into this kind of thing, then you might like the touch of oak for the doors, and also the sleek pull handles. How about maximize in the space within each opening having pullout shelves, truly take advantage of the limited space. If you have a lot of devices then you might just like this feature, having a charging station built right in. And I’m not gonna leave you in the past, with the old charging station, it’s also half his interest, built in wireless charging. For me, this solves a lot of issues. If you want to add a surround sound receiver as well, then that’s not a problem. Just simply remove one of the shelves and then you can install it here. And with all of that, you should still have enough room for your modem and your wireless router, which brings me to today’s sponsor, Express VPN. VPN stands for Virtual Private Network, and in a nutshell, the main purpose of this is privacy. I’ll touch more on this later on in the video. But I’m sure you want to see how this thing is made, and how it came together, so let’s do it now.
To get started, I’m gonna take a sheet of 3/4 inch plywood, then I’m gonna rip that down to manageable pieces, so I can fine tune those on the table saw. When I’m cutting down sheets of plywood, and of course when I remember, I like to add support on the backside of the plywood, so when I cut and pass it doesn’t fall. And at this point, I have the plywood are sure up to its final width, and now it’s time to make a crosscut and I’m going to use the DIY circular saw guide to make the French cleat support. I’m gonna set the blade to 45 degrees, and then rip those on a table saw.
The doors were made from one by ten oak, which I then trimmed down to size. And at this point, I have everything cut down to its final dimensions, which is probably a good time to go ahead and send it all down, and this will make life a lot easier, especially when I have tight areas to get to. I’ll do one final sanding once it’s all assembled. So now I’m gonna shift the attention to cutting out a section on the backside of the drawers, and this cutout is all about cable management.
And this area is where I envision all the iPads to come when they need a charge, and the other drawer will look identical, but on the back side of it, it has a smaller cutout. At this point, I’ll start the Assembly of the cabinet. There are a number of ways that you can join the bottom to the side for this case, I’m gonna use dowels, and although these are a quick solution they can be a pain to get things lined up, but using a dowel jig is usually make this a whole lot smoother. And after attaching the first side, I’ll do the same thing on the opposite side.
I was a bit conservative on the overall depth of the media center, so I wanted to maximize every square inch on the inside, and in result of that, I used a half inch piece of plywood on the backside of the cabinet. It’s not only giving me a little extra room on a handset but it also makes it lighter. I installed the back using pocket hole screws, and this worked out really well. I wrapped the pullout shelves with 1×2 pine. This added support to the side for the drawer slides, and also covered the plywood layers to speed up this process. I use the Bratton as to hold the trim on while the glue set up. These door handles are tough fine, and besides that, they didn’t come with instructions. With that in mind, I figured installing them in a closed position would have got me close enough. They are spring-loaded, and it can work really well with heavy doors. [Music].
Next it was on to install an emitter support. These were doubled up. The first side was installed with pakka hollow screws, and after double checking and square in I didn’t install the second side with glue, just to cover up the pocket holes. In order to have the best clearance for the devices under the shelves, I decided to trim the front down by creating an arch, which I then used a router with the flush cut bit
How to Hide Wires Cables for Wall Mounted TV
If you’re looking for an affordable and easy way to manage the cords and cables for your wall mounted TV, the Epic ConnectTV Cable Management Kit is a great option. The kit includes four 16-inch sections of cable channel, a right angle or 90 degree adapter, color-coded wire management clips, screws and connecting pieces. With just a few simple tools, you can easily and quickly install the Epic Connect TV Cable Management Kit to keep your cords and cables neatly organized and out of sight.
Male Female USB Extension Cable for TV, PC, Laptop Other Devices
The Male Female USB Extension Cable is a simple and easy way to connect a USB device to a TV, PC, laptop or other device. The cable is available in lengths of 1.5 meters, 5 meters and 10 meters, and is perfect for use with a smart TV or normal TV. The quality of the cable is good, and it is very easy to use. Simply connect the cable to the device and the other end to the USB device and you are good to go. The cable is a great way to extend the USB connection on your device, and is a great way to connect a USB device to a TV, PC, laptop or other device.
Universal Projector Mount for $22 – Unboxing Installation DIY
The VEVO mount is a great universal projector mount for under $25. It is very versatile and can be used with a lot of different projectors. It is easy to install and comes with all the necessary hardware.
Best Wire Management Practices in Commercial Railed and Rail-less Solar PV
Whether you choose to install a rail based or rail-less, also known as direct-attach system, properly securing PV conductor wires is critical to the productivity, safety, and longevity of your solar array. These practices help ensure a safe and durable system is installed and that the wires will be shielded from exposure to sunlight, rain, snow and wind, as well as protected from sharp abrasions and edges, and discourage animals from chewing on hanging wires. In this video, we will cover the best practices for minimizing and organizing PV wires for both small and large scaled solar projects.
In the first stage of wire management in rail based or rail-less designs, when you’re installing and wiring together a single string of modules, the conductors are plugged together and the wires need to be clipped to the frames and cannot sag. But it is after this where the two install methods begin to deviate.
We often get questions from installers who are looking for guidance on how to route the wiring from the string ends to the home run. This step is crucial with any PV system. It’s usually not too difficult with small residential installation, but it can be a bit more complicated to plan out and execute for larger commercial systems. Here are some of the common questions installers ask us when they’re beginning their wire management planning. How do you lay out the wires while also minimizing them all over the roof? What do you do if your string ends in the middle of an array and you have to run wire from the middle of the array where the home run starts, usually at the edge of the array? How do you know whether to use conduit or cable trays for wire management? Or do you just zip, tie the wires to the modules or both. When the conductor wires are bundling up, how do you plan where to attach them or whether to use wire trays? How do you install or mount module level power electronics optimizers and microinverters, when using direct-attach.
We’ve put together a list of the best practices to help answer these questions and guide installers in PV installation when using the direct-attach, rail-less method, and we offer comparisons to railed systems to help demonstrate the installation efficiency of the direct-attach method.
Thinking about how the modules will be laid out beforehand will help you minimize the wires all over the roof. You can design the strings to minimize the wires needed to route the power from the strings to the inverter. And we’ll show you two ways to lay out your wires and explain how you can save time and money by choosing the right wire design for your roof.
The first option is the Direct Method. This method enables you to lay out your modules and strings close together. On the right you can see that it will take a lot more wire to get to the home run. This is why your string design is so important. Design your strings to make it easier to wire them together.
The Direct Method involves running each string of connected modules down, or up as the case may be, the panels to the home run. These wires can be laid out ahead of module installation or as module installation progresses. Whether you choose to install ahead of time or on the fly, the direct method generally results in more time on site and higher labor costs on a project of this size.
The second wiring option is the tree trunk method. This is another way to layout panels and strings, which offers benefits over the direct method. Note, the strings in the right image have the conductor ends, pluses and minuses, more organized for bundling and routing. This method will simplify your wires so that you can bundle them together when running them to the home run.
The trunk design requires more planning before and after you get up on the roof. This method generally requires the use of cable trays or conduits to protect the wires, so you must lay out your wiring on the roof before you install the modules. With this method, the trunks can be large bundles of conductors laid in wire trays, saving you labor time tying up all the conductors. While some hard goods cost is incurred for cable trays or conduits, when using the tree trump method, it greatly simplifies your wire routing and associated labour by eliminating the management of random strings all over the place.
Let’s compare the two methods. In the direct approach, you have to attach all the wires individually to the modules frames, or PVKITs, as the modules and PVKITs are installed on the fly. This approach is preferred by some installers, but when you compare this to the second method, these two fundamentally different approaches can vary widely in cost. Ultimately, you can save time and money by using specific wiring designs such as the trunk method.
The Trunk Method requires more work to be completed before module
How to make a TV panel – Wall mount a TV and hide the wires
In this video, the creator shows us how to make a backlit LED panel for the TV, along with mounting the TV and also adding an outlet behind the TV. He starts by cutting a piece of birch plywood to size, then ripping it down to width. He then builds a frame around the plywood, applying wood glue and screws to secure it. Once the frame is built, he attaches edge banding to the plywood to cover the raw edges. He then takes the panel to the room where he plans to install it, and uses a stud finder to mark the location of the studs in the wall. He then mounts the panel to the studs using French cleats. He runs the power and coaxial cables behind the panel, then drills a hole in the panel to access the cables. He then installs an outlet behind the panel, and tests it to make sure it’s working properly. Finally, he installs the LED strip around the frame of the panel.
How to hide TV cables in the wall – low voltage HDMI CAT5 Speaker wires
In this video, the creator shows the viewer one of the cheapest ways to hide TV wires by running the low voltage wires behind the wall. This method is not code compliant, but a lot of people do it anyway. The creator first marks the wall where the studs are, then uses a saw to cut out the space for the bracket. The bracket has little plastic tabs that clamp onto the back of the drywall. The creator then threads the wires through the holes on the back of the TV bracket and tapes them to a coat hanger. The coat hanger is used to pull the wires through the wall. The wires are then connected to the TV. The video is helpful for those looking for a cheap way to hide their TV wires.